Eclipse weekend was very productive for me—and making jam involves a lot of hurry-up-and-wait that's perfect for making incremental progress on sewing. After the skirt was done up, I thought I'd get started on eyelets for the bodice lining. I like eyelets, but they're hard on my hands, so my brilliant idea was to get them started and do a few at a time interspersed with other sewing tasks. Boredom-buster and wrist-saver all in one! (And as it turned out, this strategy probably saved me from kind of...sawing through my fingers with the button thread. Vicious creature, that.)
 |
| Featuring my...uh...eight-year-old snowflake pajamas. |
I'd left wide margins when I cut the bodice pieces, mainly to stave off fraying, but it turned out useful for making the base for eyelets, too. I had enough fabric to do a double-folded hem on each side edge, which gave me three layers of fabric to anchor the eyelets. To be sure the hem was well-anchored, I used a tiny stab stitch rather than my usual slip stitch. Being able to count the threads covered by each stitch is viscerally satisfying for me. I may not be able to reliably feed myself three meals a day (this is why we like routine), but by god I can sew a mean seam.
 |
| At this moment we were shouting at the people featured in the documentary on the castle used for Downton Abbey that their lifestyle was just not sustainable, even if they only employed two cooks and ate pheasant in season. |
After folding up the excess length in the lining panels (I cut them on the same pattern as the outer silk layer, which has extra length so it can be gathered slightly to create the characteristic horizontal wrinkles across the belly), I marked the placement of the eyelets. There may have been swearing. Hole placement for spiral lacing defeats me every time (you might be able to see the doubled marking on the farthest edge in the photo. I got it wrong. No one was shocked).
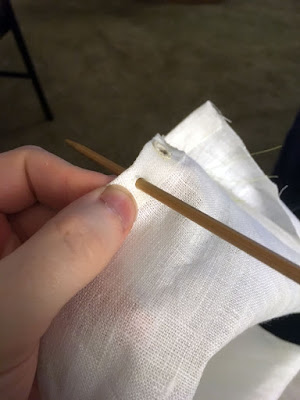 |
| I don't use large double-pointed needles very often, except as makeshift awls for eyelets. |
First step for eyelets, at least if you're trying to preserve as much of the fabric's integrity as possible, is to force the weave to open without breaking threads. Ideally you'd use an awl, but I'm allergic to single-purpose tools sometimes and haven't bought one. Instead I use a size 5 or 6 DPN and wriggle the point through the fabric until I can slide the whole needle through. If I wanted bigger eyelets, I'd start with this size and follow it up with a larger needle.
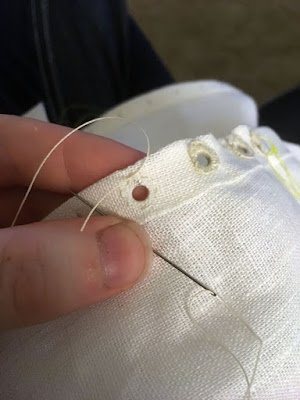 |
| I was very satisfied with how thoroughly making the holes obliterated the pencil marks. |
I do a quick running stitch border on my eyelets; it helps me keep my stitches fairly even, and anchors the thread a little more before I start hauling on it to firm up the eyelet edges. For these, I also tied off the tail to get it pointing the direction I was going to stitch, so I could cover it completely as I worked the eyelet.
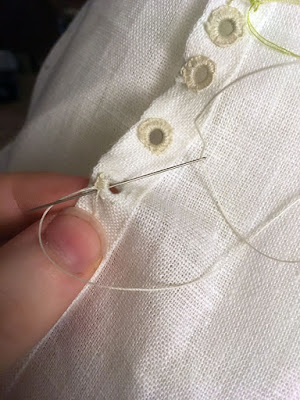 |
| That right-angle kink in the (cotton) thread is where the needle eye was a few stitches ago. |
Chances are good-to-certain that I work my eyelets far more tightly than necessary, but I never have to worry about the thread shifting and wearing out early. It would also
probably be cleaner to use finer thread, but a) I'm in a wee bit of a hurry and b) no. Perhaps when I make a beautiful flossed Victorian corset, but until then: no. In person, the button thread is also much less yellow-looking compared to the linen.
The screaming green thread in the upper corner is marking the first fold point for the lower hem, which I didn't want to stitch down until I'd finished the eyelets—three of them are technically under that hem, and working them would have been much slower had I needed to dodge an extra layer of fabric.
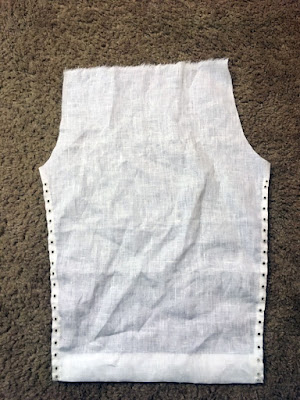 |
| Yes, this piece is distorted. It looks much better having been washed and ironed. |
I finished all the eyelets on the back piece (38 total) over the weekend, including a not-insignificant number during the eclipse, out in a field. Those ones are
special. Not that I know which they are anymore. They're still special. The bottom hem is done with the same minuscule stab stitch as the side hems, and when I construct the bodice, the smooth side of the lining will face the outer silk, to minimize the bumps that show through. Shot silk is many things, but forgiving isn't one of them.
I don't have photos to prove it, but I did finish the front piece over a few evenings the following week. That was another 34 eyelets, because the back piece has all the extras that allow for spiral lacing, and my hands were absolutely 100% done with my shenanigans by the end of it. Good thing I don't need to make any more eyelets for a while, and I'm allowing more time for the process on the next project.


Comments
Post a Comment